Gmail Notifier ဆိုတဲ့ေဆာ့၀ဲကိုေတာ့ ကၽြန္ေတာ္တို႔ျမန္မာႏိုင္ငံမွာ အသံုးနည္းပါတယ္
ဘာေၾကာင့္လဲဆိုေတာ့ ပိုက္ပိုက္ေပး၀ယ္မွ Full Version အျဖစ္ အသံုးျပဳလို႔ရတာရယ္
ႏိုင္ငံနဲ႔အ၀ွမ္း အသံုးနည္းေတာ့ မၾကားဖူးတာရယ္ေၾကာင့္ ျဖစ္မယ္ထင္တာပါပဲ
ဒီပို႔စ္မွာေတာ့ Gmail Notifier Pro 5.0.1 ကို ပိုက္ပိုက္မကုန္ပဲ Free သံုးႏိုင္ေအာင္ ျပန္လည္မွ်ေ၀ေပးထားပါတယ္
ပက္ပက္စက္စက္လည္း လန္းတဲ့အေၾကာင္း လက္တို႔ပါရေစ
ဒီေဆာ့၀ဲေလးကို Install လုပ္ထားလိုက္ၿပီး
ျပင္ဆင္စရာရွိတာေတြကို ျပင္ဆင္ၿပီးသြားၿပီဆိုရင္ျဖင့္
သူငယ္ခ်င္းတို႔ရဲ႕ gmail ေတြ Facebook mail ေတြ Twitter mail ေတြ .. ေအာ္ . mail အားလံုးနီးပါးထဲကို ၀င္လာတဲ့ mail အသစ္ေတြကို ကြန္ပ်ဴတာရဲ႕ ညာဖက္ေအာက္ေဒါင့္ေလးကေန Noti ျပေပးမွာျဖစ္ပါတယ္
ေအာက္ကပံုမ်ိဳးေပါ့
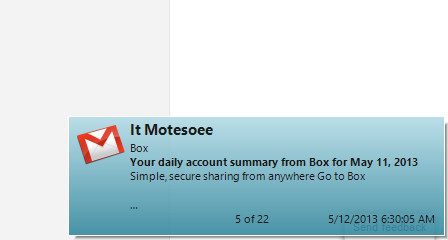
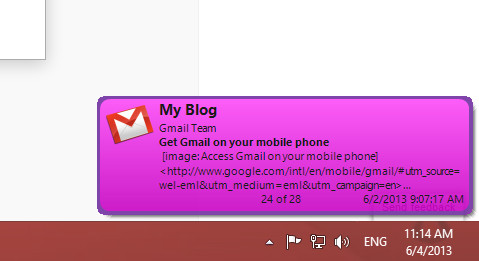
အဲဒီလို ကိုယ့္မွာရွိသမွ်အေကာင့္ေတြရဲ႕ ၀င္လာသမွ် ေမးေတြကို အခ်ိန္နဲ႔တစ္ေျပးညီ
သိရွိႏိုင္မယ္ ..
အလြယ္တကူ နဲ႔ Reply ျပန္ႏိုင္မယ္ ...
ေနာက္ၿပီးတျခား လန္းတဲ့အခ်က္ေတြ အမ်ားႀကီးပဲဗ် ... သံုးၾကည့္မွ ကၽြန္ေတာ္ေျပာတာထက္
ပိုၿပီးမ်ားတဲ့ ေကာင္းကြက္ေတြ ရွိေနပါေသးလားလို႔ လက္ခံလာပါလိမ့္မယ္
ကဲ . .စိတ္၀င္စားရင္ အရင္ဆံုး .. ေအာက္မွာ ေဒါင္းယူလိုက္ပါ
Download>>>solidfiles (or) dropbox (or) zippyshare (or) uppit
ဘာေၾကာင့္လဲဆိုေတာ့ ပိုက္ပိုက္ေပး၀ယ္မွ Full Version အျဖစ္ အသံုးျပဳလို႔ရတာရယ္
ႏိုင္ငံနဲ႔အ၀ွမ္း အသံုးနည္းေတာ့ မၾကားဖူးတာရယ္ေၾကာင့္ ျဖစ္မယ္ထင္တာပါပဲ
ဒီပို႔စ္မွာေတာ့ Gmail Notifier Pro 5.0.1 ကို ပိုက္ပိုက္မကုန္ပဲ Free သံုးႏိုင္ေအာင္ ျပန္လည္မွ်ေ၀ေပးထားပါတယ္
ပက္ပက္စက္စက္လည္း လန္းတဲ့အေၾကာင္း လက္တို႔ပါရေစ
ဒီေဆာ့၀ဲေလးကို Install လုပ္ထားလိုက္ၿပီး
ျပင္ဆင္စရာရွိတာေတြကို ျပင္ဆင္ၿပီးသြားၿပီဆိုရင္ျဖင့္
သူငယ္ခ်င္းတို႔ရဲ႕ gmail ေတြ Facebook mail ေတြ Twitter mail ေတြ .. ေအာ္ . mail အားလံုးနီးပါးထဲကို ၀င္လာတဲ့ mail အသစ္ေတြကို ကြန္ပ်ဴတာရဲ႕ ညာဖက္ေအာက္ေဒါင့္ေလးကေန Noti ျပေပးမွာျဖစ္ပါတယ္
ေအာက္ကပံုမ်ိဳးေပါ့


အဲဒီလို ကိုယ့္မွာရွိသမွ်အေကာင့္ေတြရဲ႕ ၀င္လာသမွ် ေမးေတြကို အခ်ိန္နဲ႔တစ္ေျပးညီ
သိရွိႏိုင္မယ္ ..
အလြယ္တကူ နဲ႔ Reply ျပန္ႏိုင္မယ္ ...
ေနာက္ၿပီးတျခား လန္းတဲ့အခ်က္ေတြ အမ်ားႀကီးပဲဗ် ... သံုးၾကည့္မွ ကၽြန္ေတာ္ေျပာတာထက္
ပိုၿပီးမ်ားတဲ့ ေကာင္းကြက္ေတြ ရွိေနပါေသးလားလို႔ လက္ခံလာပါလိမ့္မယ္
ကဲ . .စိတ္၀င္စားရင္ အရင္ဆံုး .. ေအာက္မွာ ေဒါင္းယူလိုက္ပါ
ေဒါင္းလို႔ၿပီးသြားရင္ Full Version ျဖစ္ေအာင္ Crack ပံုကို ေသခ်ာဖတ္ပါဦး
အရင္ဆံုး ေဒါင္းလို႔ရလာတဲ့ထဲက GmailNotifierPro ဆိုတဲ့ exe ဖိုင္ကို Run ၿပီး Install လုပ္လိုက္ပါ
Install လုပ္လို႔ၿပီးတဲ့ ေနာက္ဆံုးအဆင့္မွာ ပ႐ိုဂရမ္ Lunch မလုပ္ေစပဲ ( မ Run ေစပဲ ) ပိတ္ပစ္လိုက္ပါ
တစ္ကယ္လို႔ ဒီအဆင့္မွာေမ့သြားလို႔ Run သြားရင္လည္း ပ႐ိုဂရမ္ကို ပိတ္လိုက္ပါ ၿပီးရင္ ေအာက္က ဘားတန္းထဲမွာ Gmail Notifier ရဲ႕ အိုင္ကြန္ေလး run ေနတာကိုရွာၿပီး Right Click >> Exit လုပ္ေပးပါ
( အဲဒီအိုင္ကြန္ေလးက မ်ားေသာအားျဖင့္ အလံပံုေလးရဲ႕ဘယ္ဖက္က အေပၚျမွားျဖဴျဖဴေလးထဲမွာ ရွိပါတယ္)
ၿပီးရင္ .. ( ေသေသခ်ာခ်ာဖတ္ပါေနာ္ )
၁ .. gmail_not.keygen ဆိုတဲ့ဖိုင္ကို Run လိုက္ပါ ေအာက္ကပံုအတိုင္း ပြင့္လာပါမယ္
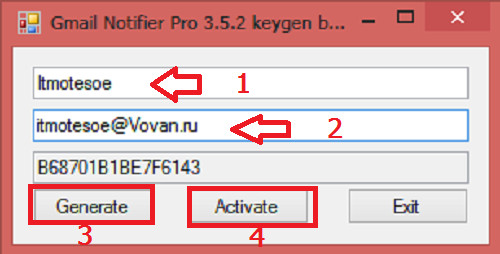
ပြင့္လာတဲ့ထဲက Name မွာ ကိုယ္ႀကိဳက္တဲ့နံမည္ထည့္ပါ
email မွာ အဲဒီထည့္ထားတဲ့နံမည္ကို စာလံုးအေသးနဲ႔ @ ရဲ႕ေရွ႕မွထည့္ေပးပါ
ၿပီးရင္ Generate ကိုႏွိပ္ပါ
ၿပီးရင္ Activate ကိုႏွိပ္ပါ
ပြင့္လာတဲ့ထဲကေန
Windows 8 မွာဆိုရင္ partition C ကိုဖြင့္ပါ
Users ဆိုတဲ့ဖိုဒါကိုဖြင့္ပါ
AppData ဆိုတဲ့ဖိုဒါကိုဖြင့္ပါ
Roaming ဆိုတဲ့ဖိုဒါကိုဖြင့္ပါ
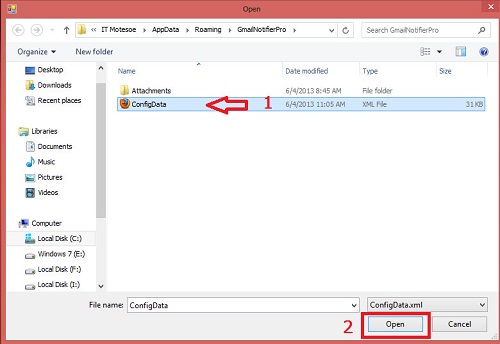
GmailNotifierPro ဆိုတဲ့ဖိုဒါကိုဖြင့္ပါ
ConfigData.xml ဆိုတဲ့ဖိုင္ကို ကလစ္ႏွိပ္ၿပီး ေအာက္နားက Open ကိုႏွိပ္ေပးလိုက္ပါ ( ၀င္းဒိုးမွာ Default အျဖစ္ထားတဲ့ Browser ရဲ႕ အိုင္ကြန္ပံုေလးအျဖစ္ ေတြ႕ရမွာပါ
တျခား၀င္းဒိုးေတြဆိုရင္ေတာ့
Partition C
users
%userprofiles% (ဒါကိုေတာ့ ေတြခ်င္မွေတြ႕မယ္)
Local Settings
Application Data
GmailNotifierPro အဲဒီလို ဖိုဒါေတြကို အဆင့္ဆင့္ဖြင့္၀င္သြားၿပီး
ConfigData.xml ဆိုတဲ့ ဖိုင္ေလးကို ကလစ္ေပးၿပီး ေအာက္နားက Open ကိုႏွိပ္ေပးလိုက္ပါ
ၿပီးရင္ Gmail Notifier ပ႐ိုဂရမ္ကို ဖြင့္ၾကည့္လိုက္ပါ
ပြင့္လာတဲ့ Box ထဲက ဘယ္ဖက္ေအာက္ဆံုးေဒါင့္နားမွာ Registered ဆိုတဲ့စာလံုးကိုေတြ႕ရင္ Full Version ျဖစ္သြားပါၿပီ
အဲဒီလိုမဟုတ္ခဲ့ရင္လည္း စိတ္မညစ္ပါနဲ႔ အဲဒီေဆာ့၀ဲကို Uninstall လုပ္ၿပီး C ထဲမွာရွိေနသမွ် Gmail Notifier နဲ႔ဆိုင္တဲ့ ဖုိဒါေတြ ဖိုင္ေတြ အားလံုးကို ဖ်က္ပစ္လိုက္ပါ
ၿပီးရင္ Install ျပန္လုပ္ပါ ..
ျပန္ၿပီး Crack ပါ ..
ေသခ်ာေပါက္ Full Version ျဖစ္ေအာင္လုပ္လို႔ရပါတယ္
ကဲ .. Full Version ျဖစ္သြားၿပီေပါ့ ..
ဒီေဆာ့၀ဲကို မသံုးခင္ အရင္ဆံုး ဒီေဆာ့၀ဲနဲ႔ ခ်ိတ္ဆက္မယ့္ gmail ေတြကို လိုက္ျပင္ရေအာင္
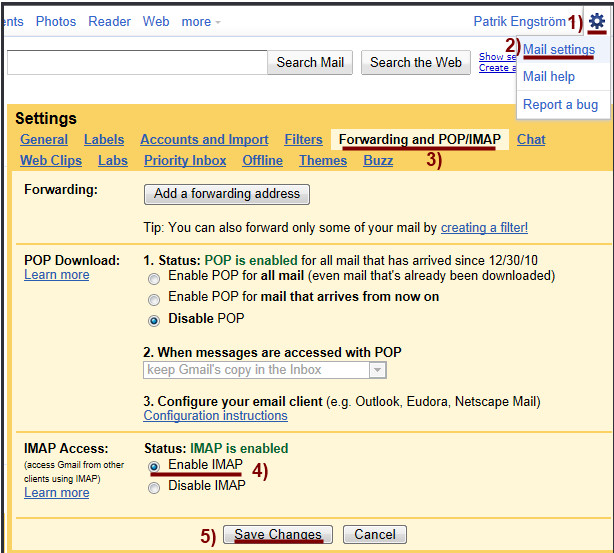
ကိုယ္ခ်ိတ္ဆက္မယ့္ gmail အေကာင့္ကို Sing in ၀င္ပါ
ၿပီးရင္ Settings ကိုႏွိပ္ပါ
ပြင့္လာတဲ့ထဲကေန Mail Settings ကိုႏွိပ္ပါ
ပြင့္လာတဲ့ထဲက Forwarding and POP/IMAP
ပြင့္လာတဲ့ထဲက Enable IMAP ရဲ႕ေရွ႕မွာ အမွတ္တပ္ေပးၿပီး ေအာက္ဆံုးက Save Changes ကိုႏွိပ္လိုက္ပါ
ၿပီးရင္ အဲဒီအေကာင့္ကို Sign Out ျပန္ထြက္ပါ
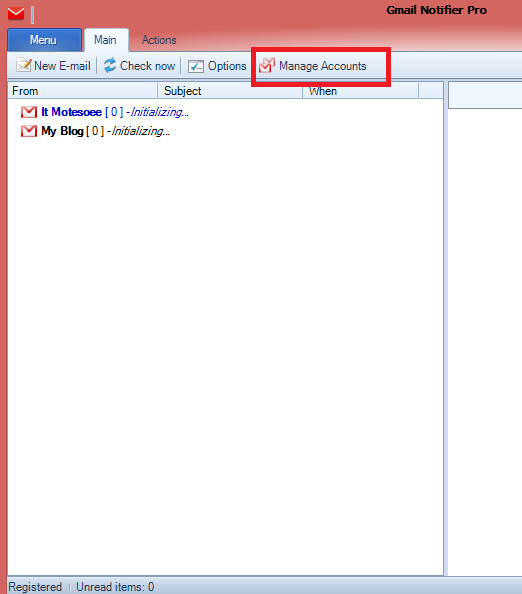
ၿပီးရင္ Gmail Notifier ေဆာ့၀ဲကို Run ပါ
ပြင့္လာတဲ့ Box ထဲက Manage accounts ကိုႏွိပ္ပါ
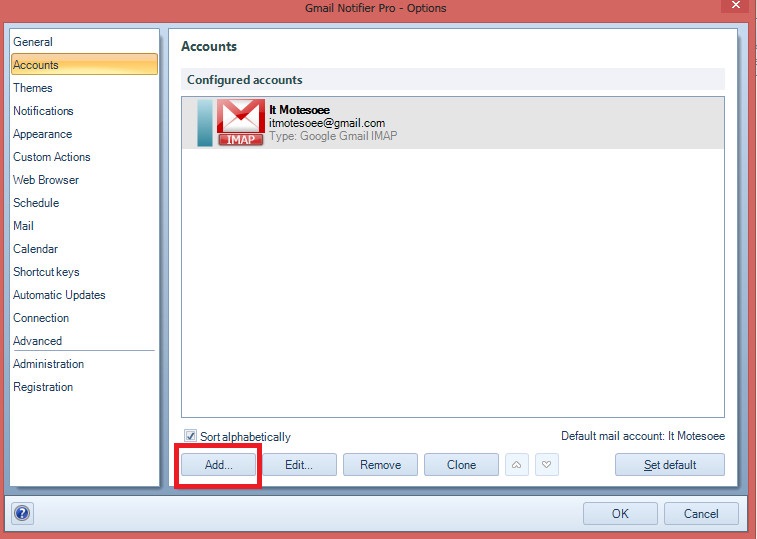
ပြင့္လာတဲ့ထဲက Add ကိုႏွိပ္ပါ
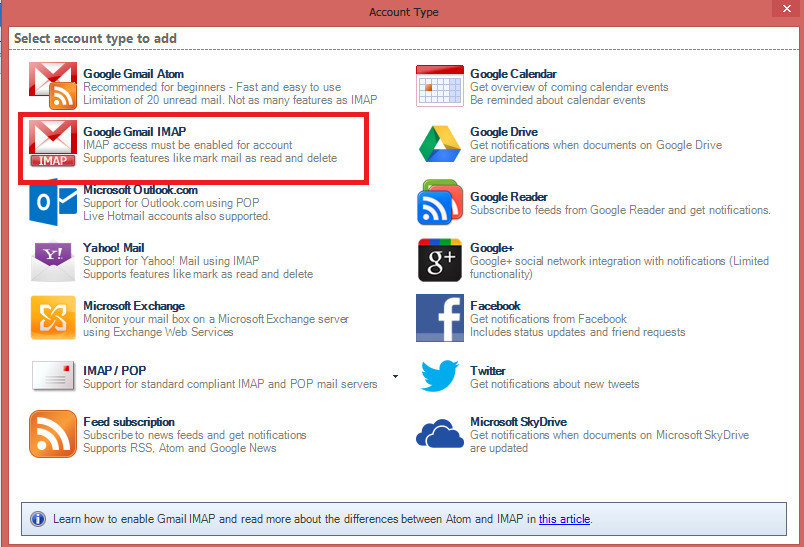
ပြင့္လာတဲ့ထဲက Google Gmail IMAP ကိုႏွိပ္ပါ
ပြင့္လာတဲ့ထဲက Description အကြက္မွာ ကိုယ္သတ္မွတ္ခ်င္တဲ့နံမည္ကို ထည့္ပါ
Email Address အကြက္မွာ ကိုယ့္ခ်ိတ္ဆက္မယ့္ အေကာင့္ရဲက email ကိုထည့္ပါ
password အကြက္မွာ အဲဒီအေကာင့္ရဲ႕ password ကိုထည့္ပါ
ၿပီးရင္ Ok ကိုႏွိပ္ေပးလိုက္ပါ
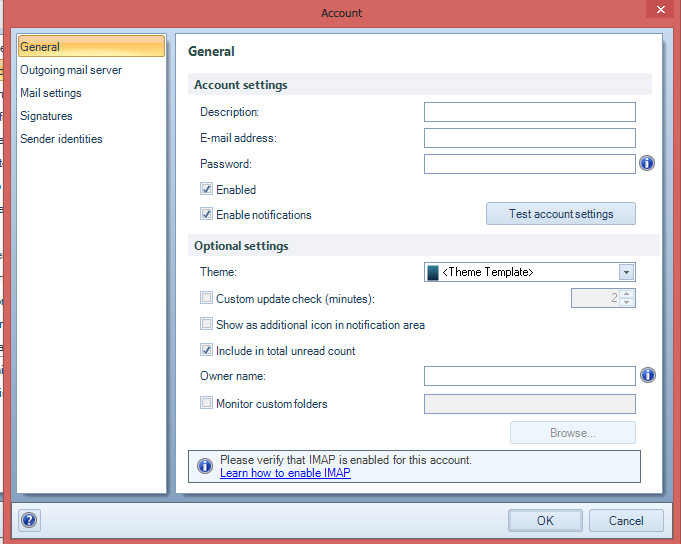
ဒါဆိုရင္ အေကာင့္တစ္ခု ခ်ိတ္ဆက္ျခင္း ၿပီးသြားပါၿပီ ..
တျခားေနာက္ထပ္ အေကာင့္ေတြကိုလည္း ဒီလိုပဲ အဆင့္ဆင့္ ခ်ိတ္ဆက္ေပးလိုက္ပါ
ကဲ .. ၿပီးရင္ gmail notifier မွာ ေဇာ္ဂ်ီေဖာင့္ ျမင္ရေအာင္
Mail ကိုႏွိပ္ၿပီး ပြင့္လာတဲ့ ဘယ္ဖက္အျခမ္းထဲက Custom font ေရွ႕မွာအမွတ္တပ္
ၿပီးရင္ Zawgyi One ကိုေရြး
ေအာက္ဆံုးက Ok ကိုႏွိပ္ ...
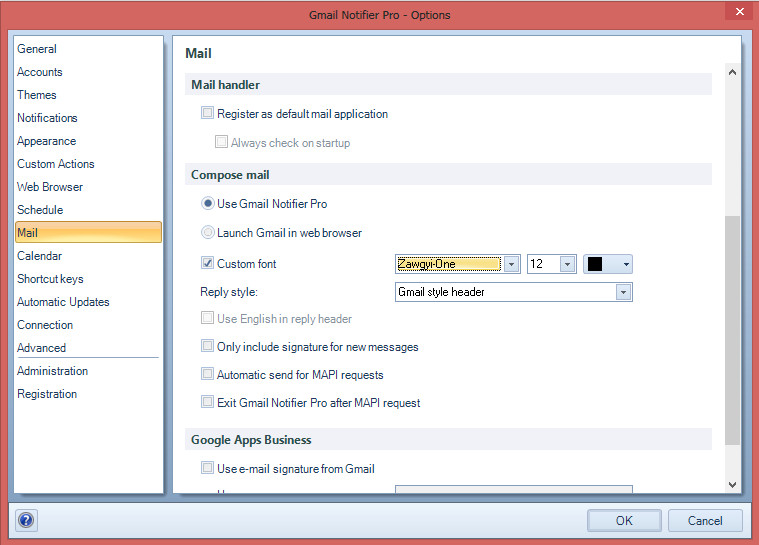
ဒါဆိုရင္ .. အဆင္ေျပသြားၿပီ
Gmail Notifier Pro 5.0.1 Full Version
Gmail Notifier Pro is a Windows application capable of checking multiple Gmail accounts for new mail and display notifications.
Feature highlights
- Check multiple Gmail accounts, including Google Apps, for new mail.
- Supports both Atom and IMAP protocols for mail.
- Supports customizable themes and individual account settings, making Gmail Notifier Pro the best looking Gmail notifier on the web!
- Read, write, reply, preview and save attachments, mark as read and delete mail without the web browser. Supports Google Contacts.
- Integration with Google Calendar accounts gives reminders for calendar events.
- Get news notifications from Google News & Google Reader.
- Supports RSS/Atom feeds to get notifications from any news source.
- Gmail Notifier Pro provides many easy-to-use features and settings.
- Define schedules when to check for mail and display notifications.
- In addition to the installation package, Gmail Notifier Pro can also run from a USB-stick without any installation.
- Gmail Notifier Pro supports automatic updates. A new version can be downloaded and installed with a single click.
- Secure account management and encrypted connections (HTTPS / SSL) are used. 100% FREE from virus, spyware and adware.
- Gmail Notifier Pro is simply the best Gmail notifier for Windows.
- Supports 32-bit & 64-bit Windows XP, Windows Vista & Windows 7.
But, it is Ok in Windows 8 ( tested by me).
You can download the program included keygen below link.
Be Enjoy! :)
Credit=>အိုင္တီမုဆိုး


0 comments:
Post a Comment